

What is MyFitnessPal
MyFitnessPal is the easiest and most convenient way to track your daily caloric goals! By customising your profile completely to ensure your hitting your required targets. Making it super easy to create meals, scan barcodes for easily tracking on the go, and can also share with friends to get some inspiration on food.

Now, which option is better? Free vs. Premium? I would highly suggest you purchase the yearly subscription of MyFitnessPal. As the free option does not allow you to accurately customise your Macronutrient and Calorie targets! This is going to allow accuracy and further education on your nutritional goals!
Now, when setting out your goals in your MFP, customising macros and calories - It will ask you to enter your height, weight, current goal, exercise regime (we will be turning the exercise component off when getting started as this is already calculated in the calories I give you).
From there MyFitnessPal is going to ‘suggest’ what your daily caloric needs us, do not be alarmed by this as once you've set it up, you will follow the next steps to change your calories and macros to which I have set for you.
- Click ‘More’ on the bottom right hand corner of your screen
- Click ‘Nutrition’
- This will bring up your Daily calorie spreadsheet
-
You will see the following
- Total calories
- Net Calories
- Goal - You will press ‘goal’
- This will send you to where you can change your calories and macronutrient breakdown!
- Select ‘Add Daily Goal’
- Select which days will apply to you (most will be everyday)
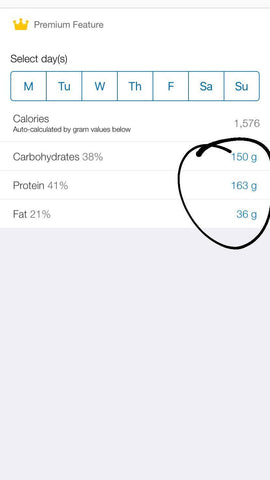
- Press on any of the blue sections where the suggested grams are and alter each macronutrient to your prescribed macros, once you have changed all three, this should equal to your daily calories already pre calculated for you
- Press the tick button once completed, let it load for a second to ensure it is saved and ready to go!
This will also help if you ever get implemented a ‘refeed day’ or ‘diet break’ from Imogen. You can then select different days to have different caloric and macronutrient needs!


- Go to the bottom right hand corner of your phone and press ‘more’
- Press ‘steps’
- Ensure you click ‘don’t track steps’ this will ensure your fitbit or apple watch doesn’t sync your workouts into your total daily calories.
Customising meals will be a godsend when you want to plan out all of the meals! Pre/post workout, dinner, dessert (my personal favourite) to ensure all your meals are in the right place!
- Go into MyFitnessPal
- Click ‘more’ bottom right hand corner
- Click ‘Settings’
- Click ‘Diary Settings’
- Click Customise meal names
- This will help you to choose whether you'd prefer your meals set out as “Meal 1,2 etc.” or “Breakfast, lunch etc.
Lets talk about how to add food into your meals
You have one of three options
- Scan the item if the item has a barcode
- Search the food up in the search bar after pressing “add food” of desired meal (please ensure if you’re doing this you select the right one, you can make sure by either reflecting back to the package or simply look up the item on coles/Woolworths website, refer it to “per 100 grams servings” as this will give you the most accurate breakdown!
- If you’re having anything without a barcode (example ALL fruit or vege) please type in search bar the product and then NUTTAB (NUTrient TABles for use in Australia) this is the most accurate when it comes to your fruit and veg, and also things like deli meats e.g chicken breast raw.
An example of looking something up with nuttab
“Chicken breast, raw, NUTTAB”
“Green beans NUTTAB”
The fact you can scan in barcodes of food items into my fitness pal… it is a lifesaver! Here is what you need to do..
- Go into MyFitnessPal
- Click ‘Diary’ at the bottom of your screen
- Go to which meal you would like to scan the item into
- Press ‘add food’
- Press ‘Scan Barcode’ Located just below the search bar
- Scan the item
- This will bring up the ‘per serving’ suggested on that packet
- If you wish you change the serving size to accommodate your allowed or desired amount click ‘Serving size’, then select ‘1 gram’ or ‘1ml’ and press the tick
- Then press ‘Number of servings’, in this put the number of how many grams you would like for that item e.g. for 100grams of chicken press serving size 1, and number of servings as 100!
Let’s talk meal prepping…. I highly suggest using the recipe feature! This is going to remove though and free up time in your week rather than playing macro tetris!
- Go into MyFitnessPal
- Select ‘My Meals, Recipes & Foods’
- It will already be on the ‘recipe’ tab
- Press ‘Create a Recipe’
- Press ‘Enter Ingredients Manually’
- Name your recipe, how many servings you're wanting to get out of it, and leave the ‘bulk import ingredients
- Select ‘Add Ingredient’
- Then either search for your ingredients or scan barcodes and alter amount as show in the previous section.
- Once added all required ingredients for recipe, Click the arrow for next
- It will show you the Calorie and Macronutrient breakdown per serving of the recipe you've created.
- Press ‘save’ and it will now be a saved recipe in your MFP, if you wish to find it just go follow the first three steps to get you to your recipe index.
If you make a bloody delicious meal, you want to be able to save that masterchef creation for later use… so save your meals in MFP! How you ask?
- Go into MFP
- Go to ‘diary’
- Scroll to the meal you loved and wish to save for later use
- At the bottom right hand corner of your meaning, there is a ‘...’ button, click that!
- From there, MyFitnessPal will give you 5 suggested options, click ‘Save as meal’
- This will direct you to Name the meal of choice and press ‘save’ at the top right hand corner.
To find your saved meals:
- Click ‘more’ on the bottom right hand corner
- Click ‘My Meals, Recipes & Foods’
- Click ‘Meals’ below the search bar
- This will show you all the meals you have saved since using MFP
- If you wish to add this to your day, click on the meal
- Press the tick icon at the top right hand corner of your screen
- It will then direct you to place that meal in the meal choice of the day e.g Lunch/Meal 2
- This will then directly place those ingredients for that meal into the selected meal for the day!